While installing Windows XP Pro on Dell Studio, I come across the following error: STOP: 0x0000007B (0xF78D2524,0xC0000034,0x00000000,0x00000000)
Solution:
1. On start up, press F2 to enter BIOS
2. Expand the "Drives" section
3. Go to "SATA Operation"
4. Change this from "RAID Auto/AHCI" to "RAID Auto/ATA"
Thursday, January 27, 2011


Wednesday, November 10, 2010
An Error (-5009 : 0x8002802b) has occurred while running the setup.
Problem:
An Error (-5009 : 0x8002802b) has occurred while running the setup. Please make sure you have finished any previous setup and closed other applications. If the error still occurs, please contact your vendor
Note: They are usually caused by the installer's InstallShield rutime, which many companies use as their installer technology. In many cases it is related to left-over files that were not deleted or were modified by previous installations of software programs.
Solution:
You must remove earlier versions of Installshield to continue. This will not harm the operation of your system.
Open My Computer and select C drive
Open "Program files" folder
Open "Common Files"
Open "Installshield"
Open "Professional"
Delete the "runtime" folder
You can now run the installation for the library software.
An Error (-5009 : 0x8002802b) has occurred while running the setup. Please make sure you have finished any previous setup and closed other applications. If the error still occurs, please contact your vendor
Note: They are usually caused by the installer's InstallShield rutime, which many companies use as their installer technology. In many cases it is related to left-over files that were not deleted or were modified by previous installations of software programs.
Solution:
You must remove earlier versions of Installshield to continue. This will not harm the operation of your system.
Open My Computer and select C drive
Open "Program files" folder
Open "Common Files"
Open "Installshield"
Open "Professional"
Delete the "runtime" folder
You can now run the installation for the library software.
Tuesday, October 26, 2010
iTunes Could Not Sync Calendars To The iPhone “iPhone_Name” Because The Sync Server Failed
Problem:
I have been syncing my iPhone using USB that connects to my computer (PC with Windows 7 OS) and I did not have any issue synchronizing my Calendar, Contacts etc. until recently when I tried to sync my iPhone with my computer (using iTunes of course), I suddenly received the following error message:

Solution: Solving this issue quite easy. Just follow the step by step below.
1. Connect your iPhone to your computer and open iTunes (If iTunes does not launch automatically, double click the application to launch iTunes).
2. Once iTunes is running, click on the iPhone in the left navigation pane
3. Once the iPhone is highlighted click the Info tab and scroll to the bottom to see the Advanced settings as shown below

4. Under “Replace Information On The iPhone”, check box next to Calendars (this will cause the iPhone calendar to be completely overwritten with the calendar items from the calendar you are syncing with)
5. Click “Apply” to start the synchronization.
I hope this helps!
Wednesday, October 13, 2010
Could not open a scratch file because the file is locked
Problem:
Could not open a scratch file because the file is locked. Use the ‘Properties’ command in the Windows Explorer to unlock the file.

Solution:
Hold down Crtl + Alt + Shift keys during phototshop start up. It will ask you if you want to delete the setting, click ok to delete it. If you do not get the prompt, try again!
Wednesday, September 1, 2010
Because of an error in data encryption, this session will end. Please try connecting to the remote computer again

Cause:
Microsoft says this is a potential race condition between the Icaapi.dll and Rdpwsx.dll dynamic-link libraries (DLLs) may cause the private certificate key on the Terminal Services server not to be synchronized.
Resolution:
Important: This procedure involve modifying the registry of the server, please take extra caution by backing up your registry key before proceeding
To resolve this issue, follow these steps:
- Start Registry Editor.
- Locate and then click the following registry subkey:
HKEY_LOCAL_MACHINE\System\CurrentControlSet\Services\TermService\Parameters - Under this registry subkey, delete the following value (s):
* Certificate
* X509 Certificate
* X509 Certificate ID - Quit Registry Editor, and then restart the server.
I hope this helps!
Wednesday, August 4, 2010
1. Visio web Shapes - Web server error. Try your search again later
Many Visio users who are trying to search for Shapes features in Visio 2003 or 2007 have been getting the above error message.

The reality is that the online search portion of Search for Shapes feature is being discontinued and the servers are being shut down. Users of Visio 2002 and later versions will only be able to search for shapes locally. The above dialog appears to be a side effect of the attempt to contact those servers.
In order to prevent the dialog, you will want to disable the attempt to search the Internet shapes in Visio 2003 / 2007. This issue doesn't impact Visio 2010, as it only searches locally.
To disable the Internet search option, follow these steps:
* Select the Tools menu, then choose Options, then select the Shape Search tab
* Expand the Search Locations
* Uncheck the box for "The Internet" location
* Click OK to save the options

Thursday, June 24, 2010
Installing Office 2007 on Terminal Server and removing user information
For those Systems Administrator (like me) or Helpdesk who have experience in installing Microsoft Office 2007 on the Terminal Server, their first big disappointment/frustration is the fact that after installing Office 2007 on the Terminal Server, the user information of the account used to install Office is replicated to all users who then run an Office application. For example, if you install office 2007 on the Terminal server using “XYZ” account, this account (XYZ) will be the owner of all the office documents/files users (on the terminal server) will then create. This fact has been a big frustration for both users and the IT administrators.
In this post, I will be describing how to delete identifying information recorded to the Terminal Server shadow registry key by Setup during Office 2007 installation and to make sure that user information of the account used to install Office is not replicated to all users.
- After installing Office 2007, make sure you DO NOT open/run any office applications.
- Go to “Run” and type “Regedit” command and perss “Enter” (this will open the registry).
- Go to:
“HKLM\SOFTWARE\Microsoft\WindowsNT\CurrentVersion\Terminal Server\Install\Software\Microsoft\Office” and delete “Office” subkey. - Reboot the Server.
Hope this helps!
New Exchange Server 2007 mailbox stamped as legacy mailbox
If you use the Exchange Server 2003/2000 extensions to Active Directory Users & Computers (ADUC) console to create mailboxes residing on Exchange Server 2007 servers, these mailboxes get stamped as legacy mailboxes.
Exchange Server 2007 mailboxes should be created using the Exchange (2007) console or shell.
To remove the legacy tag from mailboxes created using ADUC, use the following command:
Set-Mailbox "John Doe" -ApplyMandatoryProperties
This is documented in KB 931747: A mailbox that is located on an Exchange Server 2007 server may be identified as a legacy mailbox in Exchange Server 2007.
To get a list of legacy mailboxes:
Get-Mailbox | where {$_.RecipientTypeDetails -eq "legacymailbox"}
Note, not all legacy mailboxes reside on Exchange Server 2007 servers, so it's not a good idea to use the ApplyMandatoryProperties command to all of these. Mailboxes residing on Exchange Server 2003/2000 servers are also legacy mailboxes, and you may see some mailboxes moved from Exchange Server 2003/2000 servers carry this tag as well.
Let's filter the above list of legacy mailboxes to only the ones located on Exchange 2007 servers:
Get-ExchangeServer | Where {$_.IsExchange2007OrLater} | Get-Mailbox | where {$_.RecipientTypeDetails -eq "legacymailbox"}
Apply mandatory properties:
Get-ExchangeServer | Where {$_.IsExchange2007OrLater} | Get-Mailbox | where {$_.RecipientTypeDetails -eq "legacymailbox"} | Set-Mailbox -ApplyMandatoryProperties
Wednesday, June 23, 2010
No Terminal Server client access licenses available for this computer
I had a situation recently when some users tries to connect to the Terminal Server they received the following error message: The remote session was disconnected because there are no Terminal Server client access licenses available for this computer. Please contact the server administrator.

There are many options to workaround this issue. To see more of these workarounds, you can visit Microsoft website. However, I opted for the solution I am going to describe below which works wonderfully.
Note: Please note that this solution requires modification of the system’s registry. So take an extra caution (back up your registry) before proceeding.
Problem: The remote session was disconnected because there are no Terminal Server client access licenses available for this computer. Please contact the server administrator.
Solution: Create a backup of the MSLicensing registry key and its subkeys on the client, and then remove the original key and subkeys by doing the following:
- On the client, navigate to the following registry subkey:
HKEY_LOCAL_MACHINE\SOFTWARE\Microsoft\MSLicensing. - Click MSLicensing.
- On the Registry menu, click Export Registry File.
- In the File name box, type mslicensingbackup, and then click Save.
- On the Edit menu, click Delete, and then click Yes to confirm the deletion of the MSLicensing registry subkey.
- Close Registry Editor, and then restart the computer.
(Note: If you need to restore this registry key in the future, double-click mslicensingbackup.reg.)
When the client is restarted, the missing registry key is rebuilt.
Les utilisateurs n’arrivent pas à ouvrir une session sur le serveur Terminal
Pour les Administrateurs de Systèmes Windows ou les Supports Techniques, ce problème est très fréquent. Lorsque les utilisateurs essaient de se connecter au Serveur Terminal (Terminal Server) en se servant de la Connexion Bureau à Distance, ils reçoivent souvent le message d’erreur suivant:
Ressources systèmes insuffisantes pour terminer le service demandé
Ou bien leurs sessions se terminent au cours du processus de connexion sans donner aucune erreur.
Dans ce cas, l'une des raisons serait que votre serveur terminal n’utilise pas correctement la mémoire. Vérifiez le Journal des Evénements pour voir si vous pouvez trouver les événements 1500 et 1508 pour chaque tentative de connexion infructueuses. Si vous avez trouvé ces deux évèments, alors, utilisez la méthode suivante:
Pour résoudre ce problème, modifiez le Registre pour augmenter la PoolUsageMaximum valeur et la valeur PagedPoolSize. Pour ce faire, prcoédez comme suit:
- Cliquez sur Démarrer, sur Exécuter, tapez regedit, puis cliquez sur OK.
- Recherchez et cliquez sur la clé de registre suivante:
HKEY_LOCAL_MACHINE\SYSTEM\CurrentControlSet\Control\Session Manager\Memory Management - Dans le menu Edition, pointez sur Nouveau, puis cliquez sur Valeur DWORD.
- Dans la zone Nouvelle valeur # 1, tapez PoolUsageMaximum, puis appuyez sur ENTRER.
- Cliquez-droit sur PoolUsageMaximum, puis cliquez sur Modifier.
- Dans la zone Données de la valeur, tapez 60, cliquez sur Décimale, puis cliquez sur OK.
- Si l'entrée de Registre PagedPoolSize existe déjà, passez à l'étape 8. Si le PagedPoolSize entrée de Registre n'existe pas, créez-la. Pour ce faire, suivez ces étapes:
- Dans le menu Edition, pointez sur Nouveau, puis cliquez sur Valeur DWORD.
- Dans la zone Nouvelle valeur # 1, tapez PagedPoolSize, puis appuyez sur ENTRER.
-
- Right-click PagedPoolSize, puis cliquez sur Modifier.
- Dans la zone Données de la valeur, tapez ffffffff, puis cliquez sur OK.
- Quitter l'Éditeur du Registre, puis redémarrez l'ordinateur.
Bonne chance.
Friday, January 29, 2010
Raccourci CTRL+ATL+SUP Sous Mac OS X
Pour les habitueux de Windows (Windows 2000 Professionel, Windows XP, Windows Vista ou Windows 7) qui transferent sur Mac OS X, ce qui les manque le plus c'est la combinaison "CTRL+ALT+SUP" qui, à première vue n'existe pas sous Mac OS X. Cette combinaison permet de vérouiller l'écran pour la sécurité du compte de l'étulisateur.
En réalité, Mac OS X est doté d'un écran natif de verrouillage intégré, mais cet utilitaire n'est pas activé par défaut sous Mac. Pour l'activer, voici la procédure:
1. Cliquer sur Applications --> Utilitaires --> Trousseau d'Accès.
2. Double-Cliquer sur Trousseau d'Accès
3. Dans la fénêtre qui s'ouvre, Selectionner Trousseau d'Accès (en haut coté gauche de fénêtre), puis sélectionner Préférences (Voir Image ci-dessous)

4. Dans la nouvelle fénêtre qui s'affiche, sélectionnez/cocher "Afficher l'état dans la barre de menus." Un cadenas noir va apparaître dans votre barre des tâches dans le coin supérieur à droite (voir Image ci-dessous).
5. Fermez Trousseau d'accès. Maintenant, lorsque vous cliquez sur le cadenas, vous avez l'option "Verrouiller l'écran" dans le menu déroulant (voir image ci-dessous). Cliquer donc sur cette option pour vérouiller votre écran.


Cette option est en fait l'équivalent de "CTRL+ALT+SUP" que vous avez dans Windozs. A chaque fois vous voulez vérouiller votre écran, cliquez sur le cadenas, puis sélectionner "Verrouiller l'écran".
Très facile n'st ce pas?
Thursday, January 28, 2010
Désinstaller TrendMicro OfficeScan Antivirus sur un Ordinateur
Problème: Pour ceux qui ont installé TrendMicro Officescan sur leur ordinateur comme antivirus, ils doivent savoir que désinstallation Officescan nécessite un mot de passe.
Solution: Pour désinstaller le client Officescan sans avoir besoin d'un mot de passe suivre cette procédure ...
1) Se connecter sur le PC avec un compte qui possède des privilèges d'administrateur sur le PC
2) Cliquez sur Démarrer -> Exécuter et tapez regedit et appuyez sur Entrée
3) Dans l'arborescence à gauche, cliquez sur le + à côté de HKEY_LOCAL_MACHINE pour ouvrir l'arbre
4) Ouvrez les branches suivantes SOFTWARE -> TrendMicro -> PC-cillinNTCorp -> CurrentVersion -> Divers.
5) Dans la fenêtre, cliquez à droite sur le texte qui dit "Autoriser Désinstaller"
6) Remplacer la Valeur de données: ce qui est mis à 0 par 1 et cliquez sur OK
7) Ouvrez le Panneau de configuration -> Ajout / Suppression de programmes et sélectionnez TrendMircro OfficeScan Client de la liste.
8) Cliquez sur Désinstaller et le logiciel devrait être supprimée sans exiger un mot de passe.
Espérant que cet article vous a été util. Si vous avez d’autre procedure plus simple et facile que celle décrite ici, prière de bien vouloir la partager avec les autres.
Comment Changer le Mot de Passe du Compte Administrateur Sous Mac OS X
Probleme: Vous avez oublié le mot de passe administrateur de votre Mac et vous ne pouvez plus acceder a votre ordinateur. Que faire?
Solution: Si vous avez perdu le mot de passe du compte administrateur, vous ne pouvez en aucun cas acceder à votre ordinateur. Le compte administrateur possède en fait un privilège spécial qui vous permet d'installer des applications ou changer la configuration de votre ordinateur. sans ce compte, vous ne pouvez absolutment rien faire.
Je vous présente ci-dessous les étapes de changer le mot de passe du compte administrator en cas d'oubli.
1. Entrez le Disque d'installation de Mac OS X qui vient avec votre ordinateur. Par exemple, si vous êtes sous Mac OS X 10.4 Tiger, vous devez entrer le disque d'installation de Tiger. Si vous êtes sous Mac OS 10.6 Snow Leopard, vous devez entrer le disque d'installation de Snow Leopard.
2. Redémarrez l'ordinateur, maintenez la touche C enfoncée lors du démarrage. Cela pourrait prendre plus de temps que d'habitude, et vous pouvez relâcher la touche C dès que le logo Apple apparaît sur l'écran.
3. Lorsque la fenêtre s'affiche, choisissez votre langue et cliquez sur la flèche droite.
4. La prochaine étape dépend de quelle version de Mac OS X que vous utilisez. Pour Tiger (10.4) ou Leopard (10.5) ou Snow Leopard (10.6), choisissez Changer le mot de passe dans le menu Utilitaires.
Note: Pour les versions antérieures, choisissez Changer le mot de passe dans le menu Installer.

5. Choisissez votre disque dur à partir du haut, puis choisissez votre compte (que vous avez perdu le mot de passe) du menu déroulant. Soyez prudent de ne pas sélectionner l'administrateur système.
6. Maintenant entrez le nouveau mot de passe, cliquez sur Enregistrer, quittez le programme d'installation et redémarrez le ordinateur.
Note: Notez qu'il ya quelques problèmes avec cette méthode. Premièrement, Il ne change pas votre mot de passe du Trousseau d'accès. Vous devez le faire séparément. Deuxièmement, n'essayez pas cette methode si FileVault est activé. Pour changer un compte protégé par FileVault, vous devez disposer du mot de passe principal.
J'espère que cet article vous a été util.
Wednesday, January 27, 2010
Installing Data Protection Manager 2007 – Step-by-Step
I recently got into administrating Data Protection Manager Server and I have to say I love this product. I am trying hereby to share my experience with Data Protection Manager including the installing and the day-to-day administration of the DPM Server.
This post provides step-by-step installation of System Center Data Protection Manager (SCDPM) 2007 on a Windows Server 2008.
DPM 2007 Prerequisites:
Before installing Data Protection Manager 2007, please ensure that you meet all the requirements. Visit the Microsoft Website to familiarize yourself with the prerequisites.
1. Log on to the computer on which you want to install the DPM server using a domain user account that has admin privilege on the computer. Insert the DPM DVD in the DVD-ROM drive and double-click Setup.exe. On the System Center Data Protection Manager 2007 screen, click Install Data Protection Manager .

2. Review the license agreement, click I accept the license terms and conditions, and then click OK. On the Welcome page, click Next.

3. On the Prerequisites Check page, wait while DPM Setup checks software and hardware requirements. If one or more required or recommended components are missing or non-compliant, Setup displays a warning or error message.

4. Compel with the requirements by installing all the missing components. In this case, I have to install the Single Instance Store (SIS) by running the following command from the Command Prompt: “start /wait ocsetup.exe SIS-Limited /quiet /norestart”
Important: Restart the server after the command is executed.
5. You will then following prompt when the server meets all the requiremts.

6. On the Product Registration page, enter your registration information (Figure 10) and click Next. On the Installation Settings page, in the DPM Program Files section, accept the default folder or click Change to browse to a different folder. In the SQL Server settings section, specify whether you want DPM Setup to install the MS$DPM2007$ instance of Microsoft SQL Server or if you prefer to use a different local or remote instance of SQL Server that already exists.


7. On the Security Settings page, specify a strong password for the MICROSOFT$DPM$Acct and DPMR$<computer name> local user accounts, and then click Next.

8. On the Microsoft Update Opt-In page, specify if you want to sign up for the Microsoft Update service, and then click Next. You can change your Microsoft Update opt-in decision at a later time. On the Customer Experience Improvement Program page, specify if you want to enroll in the program or not, and then click Next.


9. On the Summary of Settings page, review the summary of installation settings and click Install. After the installation is complete, the Installation page (Figure 16) displays the installation status. Click Close and restart the computer.


10. Restart the Server: After the successful installation of the DPM 2007, you must install/add disks to the Storage Pool before you can start protecting your data.
Part 2: Adding Disk to Storage Pool in DPM 2007
Tuesday, January 26, 2010
Creating a PST in Outlook 2010
The Credit of the this post goes to: The Sean Blog
Here is the step-by-step guide to create a PST file in Outlook 2010. It’s pretty much the same as in Outlook 2007.
In the top left of Outlook, click on “File”.

Click on the Account Settings drop down, and then click “Account Settings…”

In the window that pops up, click the second tab “Data Files”

Click on the “Add…” icon, and then give your PST file a name (they call it “Outlook Data File, which makes much more sense to end users), choose where it goes, and then hit “OK”. By default in Windows 7, it goes into your My Documents folder into a folder called “Outlook Files”.
I’m not sure what Outlook 2010 does on earlier versions of Windows, but Outlook 2007 and earlier defaulted to C:\Documents and Settings\<username>\Local Settings\Application Data\Microsoft\Outlook. I know that because I used to have a job upgrading PC’s in a large enterprise to Windows XP, and I had to manually move over the PST files that people forgot to back up. That path is burned into my brain :)

Close the Account Settings window, and you will be back to the main Outlook window. Your new PST (Outlook Data File) will be over on the left, and you can create new folders and drag mail into them (or setup rules).

Source of the post: The Sean Blog
Uninstalling Officescan from Computer
Problem: For those who have installed TrendMicro Officescan on their computer, they know uninstalling Officescan requires a password.
Solution: To uninstall the Officescan client without the need for a password follow this procedure...
1) Login to the pc with an account that has administrator privileges to the PC
2) Click on Start -> Run and type regedit and press Enter
3) In the tree on the left click the + next to HKEY_LOCAL_MACHINE to open the tree
4) Open the following branches SOFTWARE -> TrendMicro -> PC-cillinNTCorp –> CurrentVersion -> Misc.
5) In the right window click on the text that says "Allow Uninstall"
6) Replace the Value data: which is set to 0 with 1 and click OK
7) Open the Control Panel -> Add/Remove Programs and select TrendMircro Officescan Client from the list.
8) Click Uninstall and the software should be removed without requiring a password.
Monday, January 25, 2010
Capturing Screen Shot with Mac OS X
There are several commands (keyboard combinations) on the Mac that you can use to take snapshots of the screen:
- Command-Shift-3: Take a screenshot of the screen, and save it as a file on the desktop
- Command-Shift-4: then select an area: Take a screenshot of an area and save it as a file on the desktop
- Command-Shift-4, then space, then click a window: Take a screenshot of a window and save it as a file on the desktop
- Command-Control-Shift-3: Take a screenshot of the screen, and save it to the clipboard
- Command-Control-Shift-4, then select an area: Take a screenshot of an area and save it to the clipboard
- Command-Control-Shift-4, then space, then click a window: Take a screenshot of a window and save it to the clipboard
In Leopard, the following keys can be held down while selecting an area (via Command-Shift-4 or Command-Control-Shift-4):
- Space, to lock the size of the selected region and instead move it when the mouse moves
- Shift, to resize only one edge of the selected region
- Option, to resize the selected region with its center as the anchor point
5 Tips to help keep your Passwords Secret
Form Microsoft Online Safety:
Treat your passwords with as much care as you treat the information that they protect.
Use strong passwords to log on to your computer and to any site where you enter your credit card number, or any financial or personal information—including social networking sites.
- Never provide your password over e-mail or in response to an e-mail request.
- Internet "phishing" scams use fraudulent e-mail messages to entice you to reveal your user names and passwords, steal your identity, and more. Learn more about phishing scams and how to deal with online fraud.
- Do not type passwords on computers that you do not control
- Computers such as those in Internet cafes, computer labs, kiosk systems, conferences, and airport lounges should be considered unsafe for any personal use other than anonymous Internet browsing.
- Cyber criminals can purchase keystroke logging devices which gather information typed on a computer, including passwords.
- Don't reveal passwords to others
- Keep your passwords hidden from friends or family members (especially children) who could pass them on to other, less trustworthy individuals.
- Protect any recorded passwords
- Don't store passwords on a file in your computer, because criminals will look there first.
- Keep your record of the passwords you use in a safe, secure place.
- Use more than one password
- Use different passwords for different Web sites and services.
Sunday, January 24, 2010
10 Reasons Why you should begin phasing out Exchange public folders
I have read this article this morning from http://www.blogs.techrepublic.com.com and I found it very interesting as I am also a Public Folder’s user.
Although many organizations make use of Exchange Server’s public folders feature, the time may be right to start phasing it out. The following is a list of possible reasons why you should get started now.
- Microsoft says they’re going away
Since before the release of Exchange 2007, Microsoft has been telling us that public folders will eventually be discontinued. This hasn’t happened just yet though. Public folders are alive and well in Exchange 2010. Even so, public folders probably won’t be supported in the next version of Exchange.
2. Public folder stores can be resource intensive (full text indexing)
Public folders can rob your Exchange Server of memory, disk, and CPU resources. By offloading your public folder data, you may be able to improve your Exchange server’s performance.
3. Public folders are not designed for archiving data
Many public folder stores are misused. According to Microsoft, public folders are not designed for archiving data. If you use public folders to archive Exchange data, you would be better off using a journaling mailbox instead.
4. Public folders are not designed for document sharing and collaboration
Microsoft also says public folders are not designed for document sharing and collaboration, yet that is exactly what many organizations use them for. Microsoft Office SharePoint Server is much better equipped for collaboration tasks and for document sharing than public folders have ever been.
5. Public folder data can be difficult to restore
In Exchange 2007, Microsoft introduced the recovery storage group feature as a way of making it a whole lot easier to perform granular restorations of mailbox data. Although public folders are a part of the information store, just like mailbox databases, they can’t be restored using recovery storage groups. This means that if you ever have to restore a public folder, you may be in for a headache.
6. Public folders are finally optional
Prior to the release of Exchange 2010, public folders were used for storing free/busy data, and they were also used for OAB (offline address book) downloads. In Exchange 2010, however, public folders finally became an optional feature. As long as all of your clients are running Outlook 2007 or Outlook 2010, you can get rid of your public folder store.
7. The concept of public folders is dated (long filenames, indexing)
At one time, there was a good reason for using public folders. Back in the days of Exchange Server 4, not many organizations were using long file names yet, and server indexing was still primitive. Public folders provided organizations with a great way of describing their data in granular detail and indexing it. Today, though, there are better tools for the job.
8. Public folders have been deemphasized
In Exchange Server 2007, Microsoft decided to deemphasize public folders. They’re still fully supported, but no new features were introduced. Public folders are also supported in Exchange 2010, but once again, there aren’t any new features. Essentially, this means that public folders are a stagnant feature because they have changed very little since Exchange 2003.
9. The management tools leave a lot to be desired
When Microsoft initially released Exchange Server 2007, you had only two options for managing public folders. One option was to manage public folders from the command line, using EMS commands. The other option was to keep an Exchange 2003 server on your network and use the Exchange System Manager for public folder management. SP1 for Exchange 2007 contains GUI-based public folder management tools, as does Exchange Server 2010. Even so, the tools aren’t anything to write home about.
10. Public folder data tends to collect dust
Several years back, I worked for a large organization that had an absolutely massive public folder hierarchy. The problem was that most of the public folder data had been in place since the days of Exchange 4. None of the current employees had a clue what the public folders had actually been used for, but nobody wanted to take responsibility for deleting them. My point is that you may have unimportant public folder data that’s just taking up space. What better time to prune the archives?
Thursday, January 21, 2010
How to Reset the Root (Admin) Password in VMware ESX 3.x & ESX 4.x
Disclamer: This works only with ESX 3.x and ESX 4.x servers and DOES NOT WORK ON EXSi server. The procedure below performs a password reset. It "blindly" replaces the existing root password with a new one. This is not password recovery. That is, it does not allow you to learn the original root password. VMware does not provide tools or methods to recover the original root password of an ESX host.
Problem: Sometime an administrator can forget the Root (admin) password for VMware ESX server. This post provides a solution to the problem of having a lost password for the root account on an ESX host.
If you forgot your ESX Server Root Password and try to login through the console, you will get the error message shown in figure below.

Solution: To solve this issue, you will need to reset the Root password to be able to login to the ESX server Console. To change the password for the root user, you must reboot the ESX Server host into service console only in single-user mode. To do this, follow the steps below appropriate for your version of ESX:
- Power off the Server: Since you do not have access to the console to gracefully reboot the server, you will have to physically reboot the server. If you are running the ESX server on VM, you can reboot it from the VM console.
- When the GRUB screen appears, press the space bar to stop the server from automatically booting into VMware ESX .
- Use the arrow keys to select Troubleshooting Mode option.

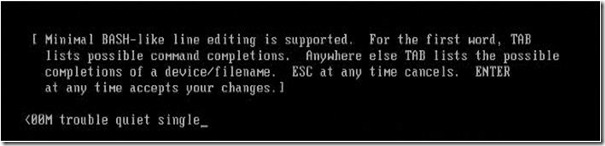
4. Press the "a" (without the quotes) key to modify the kernel arguments (boot options).
5. On the line presented, type a space followed by the word "single" (without the quotes).
Note: In this mode (Single User Mode), no user will be able to access the server, only you (the administrator/Root) on the console will be able to access the server.
6. Press Enter. The server continues to boot into single-user mode.
7. When presented with a bash prompt such as sh-2.05b#, type the command "passwd" (without the quotes) and press Enter. Please note that it is NOT "Password"


8. Follow the prompts to set a new root user password. Conform the new password by re-typing it when prompted. If you are successfull, you will see the following message: "passwd: all authentication tokens updated successfully"

9. When the password is changed successfully, reboot the host using the command "reboot" ( witout the quote) and allow VMware ESX Server to boot normally.
When the system is finished booting up, you can log in as the root user using the new password.
Subscribe to:
Posts (Atom)